Tips for Successful Satin
Stitch
As always, use a good quality floss. You won't achieve good results with any kind of stitch if you’re using cheap floss that breaks and tangles and is horrible to work with.
I usually like to work with two strands, and personally would be unlikely to use more than three for a nice smooth stitch – but that really is a matter of choice. No matter how many strands you use, when you’re separating them from the skein, do so one strand at a time and then line them up together to thread your needle, making sure they’re not twisted in any way. I have heard from some stitchers that they like to iron their floss before working satin stitch,
and I can see how this would indeed give very good results – but I am far too impatient to begin stitching I’m afraid, even though I'm trying very hard not to be!
Make sure the outline of your shape is nice and clear and unambiguous. You don’t want to be wondering where is the best place to pass your needle through the fabric as you
work. For a nice plump stitch you can outline your shape with running stitch first, then work the shape by taking your needle through the fabric just outside your back stitches so that the satin stitch sits over them.
Use a hoop. Even if you normally prefer to stitch without one, then give it a go – you may be surprised.
If you don’t have a hoop to keep your fabric taut, then it’s possible your satin stitches may grow tight causing your fabric to pucker beneath them – or alternatively loose, in which case they won’t sit beautifully straight on top of your fabric.
Choose the angle at which you’re going to work your stitches (this will depend on the shape
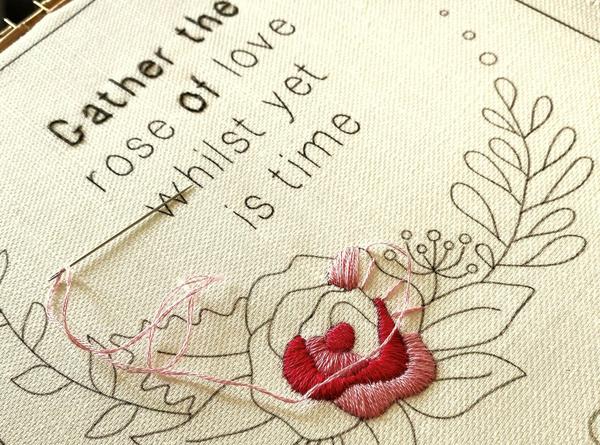
you’re stitching – if, for example you need to slant your stitches around any curves). Once you have chosen your angle, then stick to it! Beware your stitches drifting away from your chosen direction. I am particularly prone to this happening (I think I forget that floss has width as well as length and so my stitches tend to become bunched together at one end and fan out at the other). There are two ways round this problem – either draw parallel lines across the shape
with a sharp pencil (preferred) or work stitches at intervals then fill in between them. This is less satisfactory as the gaps you leave may not be the exact intervals to fill with strands of floss – you may have to squeeze extra stitches in from time to time. This is the method I'm using in the work in process image above.
Do not be tempted to bring your needle in and out of the fabric in one movement (My grandma was especially strict on this!) because (1) you will find it more difficult to follow your outline accurately and (2) the floss will enter and leave the fabric on a more oblique angle that will make your stitch flatter and far less lovely – you have been warned!
Don’t try to carry your floss across the back of your work between areas of stitching. Work each area separately, starting and finishing off as necessary. Because satin stitch depends so heavily on achieving the right tension, carrying your thread can be risky as your stitches may become loose and “wobbly.”e a good quality me an. M thes
My
I